Easier being green

Changed it to green. I went to buy some more of the mandarin paint and was told that the yellow based paints are only avaible in one type of paint, which costs $52. And that they were out of yellow base.

So I went to OSH and thought I'd get an orange there. Something similar or maybe a little darker. But then I was presented with endless possibilities. And I had no idea what new color to get. So I came home and grabbed the leftover green paint in my garage and the boys and I painted it green. And painted the boys green.

Peach Tree Dish

I stole that title from Sarah Silverman. She's funny.

MunkeyMind

My amazing eyeball loving sister-in-law is back in business on her blog, MunkeyMind. She recently discovered SketchBook Pro and has not looked up for 3 weeks.

She works as an art director and has appeared as Artist in Residence on Turf Wars.

You might remember this, especially if you've been to my house:
That is like a Chuck Close version of Barkley. He looks EXACTLY like that. Perpetually annoyed by boys.

Procrastipainting

I have a billion things I should be working on. Including dinner.

And the rest of this:

H is for Heart

Hartwell's birthday is Valentine's Day. And this year, he asked that his party's theme be "hearts. Because I'm Hartwell and my birthday is Valentine's Day." Fair enough. I have about two years left of that.
His preschool class has a Valentine's party and they hand out valentine's. I thought Hartwell would like these little felt hearts for his friends. The ones who have morning drink with him, (drinking out of the bathroom sinks), and the ones who play bikes with him and even the ones who taught him to open bags of chips by pounding the air out of them.
For the note, I used a sort of french knot. I need to improve my H's. Their simplicity is misleading.

Shelf Life

Remember this? I found it at a thrift store for $10. Which is highway robbery considering I just purchased three solid wood tables, including a five foot coffee table, from another thrift store for $35. But who's counting?

It took me forever to figure out what to do. I knew I wanted it white, but it looked so sloppy when I painted it. The first painter did not know I would be using a gloss over the green. It all worked out, though because I just distressed it letting the lime show through.

Here it is:
 As you can see, I found knobs and cups that that fit together. But how to hide the threads of the screw? My husband bought some metal tube pieces, but we would've had to cut them and all that to get them to fit. So I took some twine and a glue gun, heading back to my Mormon roots, and just wrapped and glued. It also provides a soft spot upon which the cup hangs!

Also? I need to buy two more cups. But $12 each is a little much. So I'm gonna buy them one at a time. That'll show 'em.


The DIY Show Off

Rest on your florals

How About Orange, one of my most favorite bloggers, featured a tutorial using fabric stiffener. Delightful! I love fabric...I also have a LOT of it. So I bought the product and gave it a whirl.

My only trouble was finding a surface on which to paint the fabric. I used parchment paper, but it wrinkled, which made my fabric wrinkle. And then aluminum foil, which I thought would speed up the drying time. Kinda. That seems to be the best, if not most wasteful option for me at the time.

Let me know if you know of a better way!

This pretty flower is for the amazing woman who will be hosting our craft night tonight. 

Producing Bags

Another MOMS Club raffle prize. Have I mentioned that I'm supposed to get stuff donated from local businesses? And how I tried but got shut down? So I just started making stuff?

Well, that's what happened.

These are reusable produce bags that fold up to fit in your purse. I found the pattern at Daisy Janie. The best part is you use fat quarters, so there's no actual cutting beyond the handles. Except that I couldn't find any fat quarters in my stash. But I did have these scraps I got at the Crate & Barrel Outlet store. $1/pound for Marimekko fabric? Yes, please!

Someday I'll make some for myself. It's a little weird that I just stack carrots bagless in my cart. And then the checker has to handle my produce. And not in the good way.

Here's Where I Start to Lose You...

This is a photo of my hallway...well, hallways. The green one is off the kitchen and leads to the back door, the taupe one contains all the doorways. Bedrooms, bathroom, living room. It has a built in closet which houses linens and Brother & Sisters DVDs, we have all of them, as well as medicines and toiletries.

I repainted the kitchen hall Frolic, (Still a little light for my taste), but it leads me to think I need to repaint the other hall. The brown cabinet is slowly chipping back to Navajo white and the Taupe could use a touch up...

Enter LEGO!

I built this as a model for what I want to do with the hallway. John nearly rolled his eyes, he's not into my crazy methods...but it totally worked for me...

And now,...I give you...LEGO paint model of my hall!!!

I want to paint the hall with black and white horizontal stripes! The vertical white LEGO is the cabinet trim, the cabinet will be black. The lime is the kitchen hallway. It's like the same view! (Scroll up and see!)

And like that,...you're gone.

No TV makes Courtney a bored girl.

Here they are all finished! I just have to clear coat the middle cabinets and maybe the drawers one more time.

In case you forgot, this is what I started with:
Three years later I did this:
And a year and a half later:
Based on my previous time lines, looks like I have nine months until I go nuts and paint it another color. Also? That orange floor was of-FENSIVE. Thanks for being so nice about it.

My patterns and steps appear in the previous posts...

"Mom, I yike it when you paint."

Here's something fun and interesting...all my cabinets are different sizes. I know! It's neither fun NOR interesting! But now you understand my pain. I had to design 3 different, yet matching, cabinet faces.

Not that it was hard, I have a very lazy craft person inside me who figures out how to do the least amount of work, it was just another step in what I thought was a quick face lift.

When I finish the smallest cabinets, I'll post that design as well. If it turns out...

Bored.

So I dry brushed the cabinets. Then I didn't like the navy so I painted the frame blue too, but no dry brushing.
Then:
I drew this pattern (tricky like. I made one perfect leaf and then traced it 6 times on a page that I had folded into sixths). I then made my very own carbon (graphite?) paper by scribbling on a blank sheet! Very low tech, I didn't want to leave the kitchen...

Here's my pattern, note the "carbon paper" backing:

Now I hafta finish the rest of the cabinets. I hope my boredom continues.

Also? If you do this yourself? I do not recommend a line in the center. The positions I contorted myself to paint a straight line with the right amount of paint were painful and unattractive.

Big Plans!

John and I have two garages. One, the original from 1927. It's narrow and can fit one car. One small car. And it has a spot for your oil to drain directly into the soil.

The other garage is from the 60's, I think. It used to have a cantilevered door held in place by two giant springs. One of them popped off, when it was closed, thankfully, and we ended up with a regular roller type. The "big one" as it's called, has a nice cement floor and I think would make a glorious shop for John.

The little one, or "shop" as I call it, because it's a shop, will someday be seduced into becoming a fabulous outdoor dining slash craft slash place to invite my coven for drinks.

Here's what I've been storing away for the day I just start moving everything to the big garage:
I was gonna put a french door on the side, instead of a sliding barn door. But this structure has the same bones as my little guy. You can see the double barn doors on the left of the photograph.
Plywood walls and white ceiling, please!
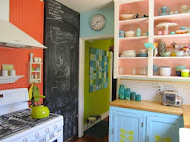
The Shabby Chic Palace, or The Reason I Wrote This Post. I loved this photo with the vintage pieces and the limed wood walls and the plank floor. John said, "You're turning my outdoor kitchen into a shabby chic palace." Which I am not. It is a Scandinavian Palace. So there.

Here's a plan I threw together to prove to John that I am not usurping his man garden:
To help you get situated, the photo at the top shows the current brown barn doors which face north. To the east is a brick patio. Which will become a Fortress of Manly Cooking and Burning. Right now it is the Resting Place of Old Plastic Toys, so anything is an improvement.

Maybe I have a pic of the whole backyard...maybe...

Nope. Not one that shows both garages. I guess I'll climb on the roof tomorrow so you can see what the heck I'm talking about...
 Two garages..one with purple painted palettes and the other with a brick patio. Taken with the miniature effect because I wasn't gonna clean up the backyard in the rain to take a photo.

Rose Parade!

Because all the streets are blocked this time of year, John and I, and one thousand others, drove to the train station and took the gold line to the Rose Parade. Yay!

The kids were miserable! Boo!
Luckily a nice man in a Wisconsin sweatshirt and Santa hat gave Bee a container of Froot Loops. And Hartwell got a street wiener.
Also, John purposely wore a red sweatshirt so the boys could find him in the crowd. We really hit all the right buttons this morning.