Hi Everyone! My mom brain kicked in and I sent the wrong link! But this nightstand is cute right? Here's the correct
Thing I Love on Thursday.
Sorry, I'm new!
It's finished! I think it turned out pretty cute. Much harder than I thought it would be, but totally worth it.
I started with a plain, pine bedside table (industry term!). I thought I would paint it some crazy color but was inspired by this:
Not Catherine O'Hara, although she is an inspiration, but that excellent wardrobe to her left. Or stage left. Or your right. Anyway, it's gorgeous and my wheels immediately started turning when I saw it in
Penelope.
Before:
The first thing I did was paint the inside a teal-blue color, since I wasn't decoupaging it. But if I did it again, I would paint the whole thing. If a little blue peeks through it's much prettier than wood.
Next, I cut the paper. I bought a scrapbooking stack with a palette I liked on sale for $8. It was
this one, 180, 12x12 sheets. I went through the stack pulling out the pages I wanted and getting it down to the exact mix of colors. Then I cut them into 3"x4" pieces and put them in order by color family.
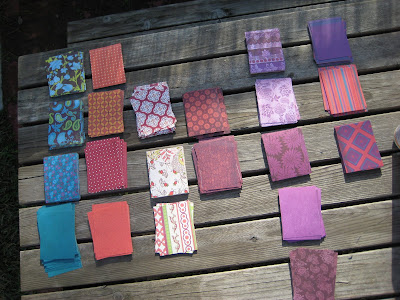
Blues, oranges, patterns, orange/purples, purples, blue/purple/oranges.This makes it much easier when you go to glue them to the table. Nothing too similar is next to each other.
After a poor start, I tried just using the ModPodge to adhere the paper, I decided to spray glue the bedside table and place pieces on. This is good for two reasons: 1. no wrinkling/bubbling and 2. you can reposition! Genius.
For the sides and the edges..it's tricky. For the edging around the table top I cut 4" x 1" strips, sprayed the glue to the backs of the strips and adhered them to the edge by kind of curling them under. For the vertical edges, I used 4" x 2" strips and centered them on the edge and wrapped them. Creating a border on the outside and inside. You can see it better in this photo:
Since the inside of the drawer was kind of gross, I just spray glued a 12" x 12" piece and popped it in.
To finish it off, I found an Anthropologie knob from a previous project that was resting inside my garage. I remember that knob was expensive, like $10, which is more than I spent on the whole project.
Here it is! All done and pretty. I walked into my bedroom after I redecorated this little area and I did a double take because it was so pretty. It needs some wall color, but still! Gorgeous!
Check out
DIY Day at
A Soft Place to Land !!
and
Metamorphosis Day!!


