Some Chair Over the Rainbow!

I bought this chair at a thrift store for $15. I just walked in, saw it and bought it. Didn't think it over. Didn't have a place for it. I just liked it and I drive a minivan.

 I knew I had to recover it, although the green was sort of nice.

I removed the cushion:
And found this:
So I went to my stash and got this:
Because I like rainbows:
John thought it was, "very colorful."

I decided to run the stripes diagonally. For fun!

So I pulled and stapled and pulled:
Nice, right?

But wait, there's more!

Today, at the lumber store, I bought a sample pot of paint. I taped the legs off and painted.
I thought for sure it would bleed, but it didn't!
Here's the chair, after a spray coat of poly on the legs:
And the leg up close:
And an overhead view + a Beckett:
And a Beckett in a chair! He wanted to sit on my "fancy chair."
It only took about two hours from start to finish including fabric picking and running out of staples. And now I have a pretty chair that makes me happy whenever I see it!

Which really helps in a house full of dirty laundry, Legos and weird, tiny pieces of confetti-like paper that hide in all the nooks and crannies as though my hallways were on some magical fairy parade route.


He's got the moves like Beckett.

Trying to capture a photo of Bee on a cell phone is like trying to grab light from the sky! He moves so fast! And he's very busy!
I love my buddha spice shelf. So happy and colorful.


life rearranged

Backsplash to the Future II: Return to Never Bland

Okay, everyone, you're right! I need to keep it simple and clean and white. I'm saving those bright colors for another place, I guess. Don't be surprised if I tile my bedroom! ("Wow, Courtney, your bedroom is very...Moroccan bathhouse?!")

After reading your comments, your very correct comments, I started on my next step, which is installing the countertop. I was looking for a video of someone installing an apron sink with a wood countertop and all the precautions one needs to take. We're installing it ourselves and it seems tricky even for carpenters!

I learned that I will have to dry fit the countertop with the cut-outs and then paint six coats of varnish on the top and bottom of the countertop. And each coat must dry 24 hours before the next coat can be applied.
So I will be countertopless for about a week.

John and I talked through all the steps:

remove sink and counter
install new sink
dry fit and cut countertop
use plywood in place of counter while we:
varnish countertop

right before countertop install:
remove backsplash tiles and faucet
install counter top
install backsplash
weep into pillow

Have I mentioned that John works all the time? He works on a TV show and his hours are crazy! He may be getting a hiatus week coming up, but usually everything has to be done on a weekend.
See the sad original tile? I've bleached and bleached and it still looks like this. But look at the soap nook! And the awesome jalousie window you can kind of make out!

So, after all that, I decided on the simplest, easiest to install tile.  I need to be able to do it myself!
Mini porcelain subway tiles! Clean, white, vintage-ish, but also modern! And cheap!

You deserve something for reading all of that, so I thought I'd show you a sink of dirty dishes! In a web-world of perfect projects and lovely homes, I thought I'd tell the truth. Which is that I'm too lazy to clean out the sink before I take a picture.

Backsplash to the Future!

This last weekend, my mom came out for a visit and I was finally able to go shopping for my kitchen! I got the Ikea birch counter tops and a white apron front sink. They are resting in a corner waiting for John and I to have time to put them in.

Then my mom wanted to go tile shopping. Since I'm installing a new sink and new countertops, my mom thought I should look at backsplashes! But I think she really wanted to look at tile for her own kitchen...

I found the one above at a fancy tile shop. Around $24/sqft. Yikes!

I found this at Home Depot for $7/sqft:
There is a slight difference but not a $17 difference!

I also thought maybe white penny tiles would be cool:
These are from modwalls in marshmallow.

John wasn't a fan, but I like how it's both vintage and modern. 

He wanted something with color. 'Cause you know what my kitchen is lacking? Color.
 So, while looking for some color for the backsplash, I found this:

Chevbone?

To get a good chevron pattern, I'd need a tile that was more than twice as long as it was wide. So like a 2" x 6". Try finding those in more than one color. (I did find them, for $40/sqft!)

But! Don't give up hope! I found these!
Individually, they look like this:
 John thought they looked too "Grecian," but they also had yellow!
It may be too much color, but it's worth a shot. It would be so fresh and fun to have a sunny backsplash!

What do you think? Should I stick with white and add pattern? Or go with color?

John's been sick and refuses to talk tile, so I'd love any input you have!!

Happy 6th Birthday, Hartwell!!

My fella is 6! He asked for squinkies boys. And an iPhone.

We spent a day last week at Disneyland. Hartwell's friends joined us that afternoon so he could go on Splash Mountain and Big Thunder Mountain, three times in a row!
We ate dinner at the Blue Bayou, his choice, and then went on the fast rides! Beckett is not a fan of rollercoasters, which was hard for Hartwell. While riding Big Thunder Mountain at night, Hartwell exclaimed, "Mom, look, it's so pretty!"
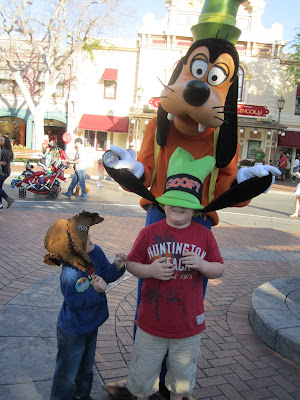
We went to the Mad Hatter to get hats. Hartwell wanted the goofy hat and Bee got a pirate hat. Their hat choices pretty much describe them perfectly.
He's just starting to take care of his brother and watch out for him. At dinner the other night, Beckett asked to use the rest room. Hartwell said, "I'll take him!"

After school today, Hartwell will pick where he wants to go. I have a feeling he's gonna say,"McDonald's!" But with my luck he's gonna was A Float Sushi.

Bags of Kisses and Hugs!

Something you should know about me. Laziness is the mother of my creativity. Valentine's day is a big deal around here. It's also Hartwell's birthday. Which means on top of putting together 50 kinder and pre-school valentines, I have to bake a cake and wrap presents and throw a party for my fella.

This year, I got a little stay-puft and bought some adorable kawaii buttons on etsy with the intention of designing a cute card to go with them.

So,...that never happened. We can't all be this creative!

I then went to an art supply store in search of something. I walked in circles for a while and ended up getting a bunch of small white paper bags and some stamps. (For some reason stamps are really expensive. Unless they're in the $1 bin. Then they're $1. If they're in the stamping section? $7.99. What the WHAT?!)
When I picked out the stamping supplies, I did select a color palette. That usually makes me happy, instead of a red, yellow and blue free-for-all. So I chose teal and red.
Hartwell told me he had fun stamping! Beckett did about half then left to watch Little Einsteins.

After the stamping, the candy time began! I filled a bowl with kisses and hugs, (ha!) and let the boys count out 5 per bag. Both boys claimed to have never eaten a kiss. Sneaky geniuses!
For the buttons, I was afraid they would get mixed in to the chocolate and forgotten. Or worse, stab someone! So I pinned them all to a little piece of cardstock.
Then, instead of having a 4 and 5 year old sign their names as if it were a mortgage, I had them sign a piece of paper, photographed it and made stickers.
Helpful Hartwell folded down the bags and I cut out and stuck the stickers.
Hartwell signs his name with a heart! And a "V" for Valentine's day.
Okay, maybe I shouldn't say lazy. It took a lot longer and had more steps than I anticipated. But the boys really liked the project and it was perfect for their age! Plus, candy!

Rich Man, Drawer Man.

I recently had one of those afternoon slumps. It was around 1:30 and I was looking at pretty blogs and I was inspired to paint! Someone had mod-podged a fun little paper on the outside of their drawers. I have a lot of paper, but these drawers would wear that paper right off. So I painted instead.

Here's a before drawer:
Yep, those are nails. The cabinets are custom built-ins from the 20's. I know this because my counters are 20" deep. And check out that pull out cutting board opening sans cutting board! Also requires customization...

I wanted to paint stripes. Horizontal stripes, white and coral. Somehow, it made perfect sense to paint the coral first and then tape off one stripe and paint white...
It did not work. The white bled like crazy and it looked bananas! So I decided to paint freehand stripes vertically. 

Okay, so, here you are in my kitchen,...hangin' out with the butterflies that make hot cocoa for Gina...
 I, nonchalantly, ask you if you need a spoon for your cocoa, (the butterflies are resting after working the molinillo...) And...

BLAM-O!
Stripes!

Lovely!

Perfect for the woman whose husband constantly leaves the drawers open while kitchen-ing. I hope this will keep me from stabbing him in the femur.


Bath of Least Resistance

I'm goin' back...to 2010 when I totally(ish) redid my bathroom with my bare hands.

The story goes that John and I started renting this fantastic little California bungalow in an amazing neighborhood. Just the two of us and a basset hound. We rented for about seven years and then started dropping hints that we wanted to buy it. So we bought a 783 sqft bungalow in LA County. And as soon as all the paperwork was signed, I started tearing that bathroom apart. It's the only bathroom! (Unless you count the random working toilet in the basement).

The first thing I did was rip out the floor. That heinous vinyl flooring was the bane of my existence.  Always looked dirty and smelled!
I peeled back the layers and this is what I saw! It looked suspiciously like the original hex tile floor! Free floor! Well, sort of...
There were five layers of linoleum and vinyl in the bathroom. FIVE! And the one that touched the original floor was glued or tarred or something. I called my neighbor over, she's an old house expert, and she informed me lacquer thinner will take that nastiness right up.
I started to wash that gunk right off of my floor.  I think the slight buzz helped.

Once the floor was done, the evil cabinet from hell had to go. It was made of particle board which is the stupidest product to make a bath cabinet out of. It absorbed water that spilled on the floor like a sponge! And it smelled. Once the cabinet was gone, we had to reconfigure the plumbing for the new pedestal sink. It took almost a week to retrofit all the pipes and such.
Then it took another few days for me to drywall and sand and paint.

We also installed the baseboard, which I wanted to be simple pine boards. I loved the gray with the pine and the vintage floor!
When I took up the floor, I discovered that the new-ish tub that was installed was a touch thinner than the original. There was a 1/4" gap where the tile ended and the tub edge began. A 1/4" space I could look into and see the basement. It was super creepy. Like I was floating on a slab of cement.

I purchased some rounded tiles and installed them along the seam.
We did not put in a new tub (sad face) and we did not re-tile the shower (sadder face) and we still have the crazy jalousie window (angry face). Mostly because I know I'm going to discover some hot mess behind the walls and it will take weeks to refinish it. And weeks without a shower are not weeks I want to spend with 3 stinky boys. I need to wait until my mom visits and gets a hotel room. Free babysitting plus shower!

Here's the finished bathroom. Please forgive the photography, it's an east facing room and nearly impossible to photograph!
And here's a photo of the creative storage solutions for crazy people like me who wanted a pretty sink instead of a boxy toilet paper holder with a sink on top.
The bottom right corner of the photo is the door jamb. That is how small the bathroom is. 5' x 7'. Used by me and three boys.
It was a super low budget renovation. Maybe $300? Sink, faucet, baseboards, escutcheons, tiles, paint...mostly elbow grease. Which I should totally start charging people for.