Hi Everyone! My mom brain kicked in and I sent the wrong link! But this nightstand is cute right? Here's the correct Thing I Love on Thursday.
Sorry, I'm new!
It's finished! I think it turned out pretty cute. Much harder than I thought it would be, but totally worth it.
I started with a plain, pine bedside table (industry term!). I thought I would paint it some crazy color but was inspired by this:
Not Catherine O'Hara, although she is an inspiration, but that excellent wardrobe to her left. Or stage left. Or your right. Anyway, it's gorgeous and my wheels immediately started turning when I saw it in Penelope.
Before:
The first thing I did was paint the inside a teal-blue color, since I wasn't decoupaging it. But if I did it again, I would paint the whole thing. If a little blue peeks through it's much prettier than wood.
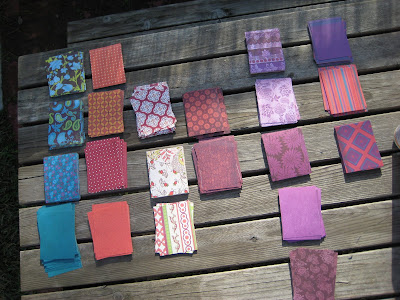
Next, I cut the paper. I bought a scrapbooking stack with a palette I liked on sale for $8. It was this one, 180, 12x12 sheets. I went through the stack pulling out the pages I wanted and getting it down to the exact mix of colors. Then I cut them into 3"x4" pieces and put them in order by color family.

Blues, oranges, patterns, orange/purples, purples, blue/purple/oranges.This makes it much easier when you go to glue them to the table. Nothing too similar is next to each other.
After a poor start, I tried just using the ModPodge to adhere the paper, I decided to spray glue the bedside table and place pieces on. This is good for two reasons: 1. no wrinkling/bubbling and 2. you can reposition! Genius.
For the sides and the edges..it's tricky. For the edging around the table top I cut 4" x 1" strips, sprayed the glue to the backs of the strips and adhered them to the edge by kind of curling them under. For the vertical edges, I used 4" x 2" strips and centered them on the edge and wrapped them. Creating a border on the outside and inside. You can see it better in this photo:
Since the inside of the drawer was kind of gross, I just spray glued a 12" x 12" piece and popped it in.
To finish it off, I found an Anthropologie knob from a previous project that was resting inside my garage. I remember that knob was expensive, like $10, which is more than I spent on the whole project.
Here it is! All done and pretty. I walked into my bedroom after I redecorated this little area and I did a double take because it was so pretty. It needs some wall color, but still! Gorgeous!
Check out DIY Day at A Soft Place to Land !!
and
Metamorphosis Day!!
Check out DIY Day at A Soft Place to Land !!
and
Metamorphosis Day!!


10 comments
Very nice! I have done a few projects with modpodge and it can be a nightmare if you get air underneath the paper. I used my trusty dusty pampered chef pie roller to smooth out all the paper. before I put the top coat on. It helped a ton. So, when are you coming to my house to do my son's room? I need something sturdy and red/blue. It would be best if it appeared without any effort on my part and was stunning on the budget. Any ideas?
Martha has a recipe for chalkboard paint:
1. Pour 1 cup of paint into a container. Add 2 tablespoons of unsanded tile grout. Mix with a paint stirrer, carefully breaking up clumps.
I think it would be fun to paint something a solid color with chalk board paint accents. Someday I want to do a world map on my boys' wall. With blue paint and green chalk board paint. But you could do a light blue dresser(?) with red chalkboard circles or squares or trucks or airplanes or planets or stars.
I wish I could magically help you. But judging by my last project, I'll have to stay with you for a week.
I love this post, and I love the new nightstand (bedside table). The $10 knob makes it perfection!
So do I understand you right, that you can have any color paint be a chalkboard surface? That is so cool. I wish I were the kind of person who could paint something with it for my kids.
Instead, I consider myself brave for handing them a pack of doilies and some foam hearts.
Like a little table and chairs. In custom chalkboard paint How cute would that be?
How cute is that!?! Great job!
Thank you! That is a fabulous post and I have just the piece at home that I have been trying to figure out what exactly can be done to it...fabulous idea!
That is really cute!!! I am super impressed. I always wish I was a more crafty person.
love it!
ohh..and bon jovi on 30 rock...
So beautiful. And how fun. Thanks so much for participating in THings I Love Thursday. Please link back to the carnival so that people can find us. Thanks!
That is so cute! Great job! And thanks for the chalkboard paint recipe. I just might have a use for that around here somewhere!
Post a Comment